 (Well, mostly…)
I still run into people who are unhappy with Windows 10. They LOVED Windows 7, hated Windows 8 (those who used it), and don’t find Windows 10 a satisfactory “step forward.”
I had a client this week who fits that description. She had a situation that made it advisable to “wipe and reload” her Windows 10 computer. But ever since she bought it (brand new with Windows 10 pre-installed), she hasn’t used it much at all because she just doesn’t like the interface. It is confusing and unfamiliar to her.
(In the interest of full disclosure, there are plenty of folks who don’t like it because apps that they came to love, which ran fine under Windows 7, no longer work in Windows 10. That’s another story entirely, and is beyond the scope of this article.)
So, I decided that, since I had to reload Windows anyway, I would work to make it look and act as much like Windows 7 as I could.
To accomplish this, I did the following:
- Back up all data
- Restore the system to factory defaults, erasing all data
- Remove the confusing “Live Tiles” from the Start menu
- Install a free app called “Classic Start” to restore the look, feel, and navigation style of Windows 7 to the Start menu
- Tweak Classic Start to keep the Windows 10 right-click Start menu, which is very helpful
- Disable the “Cortana” Windows Search assistant, which continually sends lots of personal information to Microsoft
- Put links to the most-used programs on the Windows Desktop
For those who are curious, or wish to pursue a similar course of action, here are the steps I took in more detail:
Step 1
First, of course, I backed up all of the client’s data onto an external drive.
Step 2
Next, I restored the system to factory defaults. Every manufacturer has a way to take a factory-installed operating system back to its original state. If you choose to preserve your data, you don’t really “wipe” the drive entirely. But if you choose the complete restoration, your computer ends up just like it was when it came to you from the factory or store. If you want to know how to accomplish this, Google “restore Windows [version number] [make and model of computer] to factory defaults.”
So your search would look like:
restore Windows 10 HP Pavilion 15-au030nr laptop to factory defaults
Someone is likely to have posted step-by-step instructions, and, if you’re lucky, maybe even a step-by-step video.
This step can actually take several hours. It is important NOT to turn the computer off, or attempt to do anything with it, during this time.
Step 3
Once Windows has been restored (in this case, Windows 10), it has to be updated and made current. This is done through Windows update. Windows 10 takes care of this without needing much help. Important changes were made to the Windows 10 interface with the Windows 10 Anniversary Update, one year after its initial release. These updates made it more like Windows 7 used to be, and less like Windows 8, which (Windows 8) Microsoft then retired (no longer supported).
The Anniversary Update took about another hour to complete, and then Windows 10 wanted to install the rest of the updates necessary to make it current. All of this finally completed, and the Welcome screen appeared.
Step 4
At this point, I was presented with a series of questions. All of them merit careful consideration, as they can have far-reaching and significant consequences. They will largely determine how the computer is to be used, and the degree of privacy the owner will have. My recommendation (and what I chose to do in this case) is to choose NOT to enable anything that gives Microsoft access to my private information, browsing habits, email, contacts, etc. I turned all of those off.
I chose to “Skip” logging on using my Microsoft ID. I chose just to log on locally to the computer itself.
I chose not to use “Cortana,” the voice-activated search assistant (think Siri or Alexa) that can perform a myriad of useful tasks, provided you’re willing to give Microsoft all the keys to your world. Sorry, I’m just not that anxious to hand my life over to Microsoft. (More on shutting her down a little later.)
Other settings, including date, time, time zone, etc. are self-explanatory.
Step 5
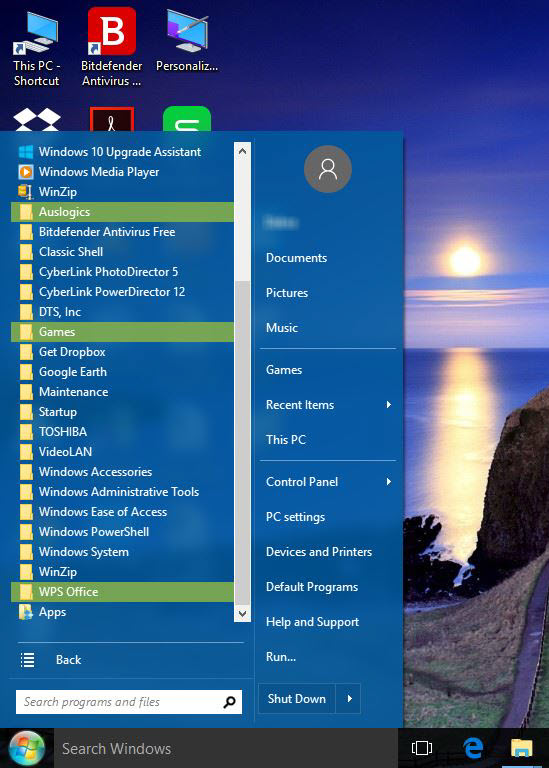
Once I finished answering the questions, the Windows 10 desktop appeared. In the Anniversary Update, the Start menu is more like Windows 7’s start menu, but different enough to be annoying. Your programs are there in alphabetical order, but you also get the “live tiles” that were introduced in Windows 8. Only now, they are part of the Start menu. I chose to right-click on each tile and Delete it.
Access to other items like Control panel, Shut down, and more, are “hidden” and are accessed through right-clicking the Start button. The Quick Launch bar, task bar, and system tray (all along the bottom of the screen) are back, with the addition of the Cortana search box (which searches both your computer and the Internet by default).
I chose to install a free program called “Classic Start,” which changes the Start menu back to the Windows 7 functionality. You can even change the button to be like the Windows 7 button graphic. After installation, I went into the Classic Start settings and specified that I wanted the right-click Windows 10 Start menu to work just like it did in Windows 10. That gives me the best of 7 (with a familiar look and navigation style) and the best of 10 (with increased functionality and useful tools). The best way to load Classic Start is through www.ninite.com.
Step 6
No matter which manufacturer you purchase from, they load your computer up with a boatload of junk, trial software, and links. I unloaded the programs that were not helpful through the Programs and Features applet in Control Panel, and deleted the links. I then went through the Start menu, and deleted links to websites, and any “leftovers” from the programs I had removed. I installed a few helpful free programs through www.ninite.com. I also made sure to install: a good antivirus program (my personal favorite is Bitdefender free edition), Adobe Acrobat Reader, a Microsoft Office Suite clone (my personal favorite is WPS Office free edition), the client’s Internet browser of choice, etc.
Step 7
Since the Windows 10 Anniversary Update, it is no longer possible to remove Cortana (see above in Step 4) completely. But you can keep her off the Internet, and make Windows search apply only to your computer. Here is what I did to make that happen:
- In the Cortana search box (next to the Start button, before the Quick Launch), I typed “Cortana settings.” In the settings, I turned off everything that would give Windows Search access to my personal information and share it over the Internet with Microsoft and other companies that want to market to me. The first setting (and the main one) is about allowing Cortana to access your private information and use the Internet. If you answered No to this in the setup questions, it should already be set to “Off.” (Each setting is a toggle. Click once for the opposite of how it is currently set, click again to go back to the previous setting.)
- I then went through every other setting (not just for Search, but for everything else too) to make sure my privacy was being protected as much as possible.
- I edited the Windows Registry. If you are not experienced in this, and don’t know what you’re doing, DON’T DO THIS YOURSELF! Get a techie friend who knows how. The Registry is the heart of Windows’ functionality, and a mistake here could cripple your Windows. Here is the edit:
- Windows key + R on your keyboard brings up the Search Window.
- Type Regedit, and click on the Regedit program in the displayed results.
- Answer Yes to the warning box to allow it to make changes to your computer.
- With the registry editor open, navigate to HKEY_LOCAL_MACHINE\Software\Policies\Microsoft\Windows
- Create a new key under “Windows” and name it Windows Search.
- Right click on the Windows Search key you just created and create a New Dword (32-bit) named AllowCortana. Make sure the value is set to 0.
- Right click on the Windows Search key you just created and create a New Dword (32-bit) named ConnectSearchUseWeb. Make sure the value is set to 0.
- Having accomplished this edit, I logged out of Windows, and then back in again. The result was that Cortana’s search box was gone, and in its place was a little magnifying glass to represent Windows Search. Clicking on the icon brought up the search box. But I wanted my little Windows Search box on the Task Bar back again. So I right-clicked on the Task Bar, and under Task Bar, at the top of the context menu, I found a setting to enable the Search box. After logging out of Windows again, and logging back in, my Search box was back, but instead of a Cortana message about searching my computer and the Internet, it simply says, “Search Windows.”
Step 8
Using the “Personalization” display settings, I restored color to the title bars in the windows, which are just plain white in Windows 10.
Step 9
Finally, I restored two things that Windows 10 was missing, which are in Windows 7: a program to play DVDs and the Windows 7 games set. You can read more about this process in a previous post here.
The end result was a leaner, cleaner, more familiar Start menu with the same links that Windows 7 used to have, and links to desired programs displayed on the Desktop, which most people have used since Windows XP. Very easy to navigate, and making it easy to find what you’re looking for.
Here is the right-click Windows 10 Start menu, which I elected to retain:
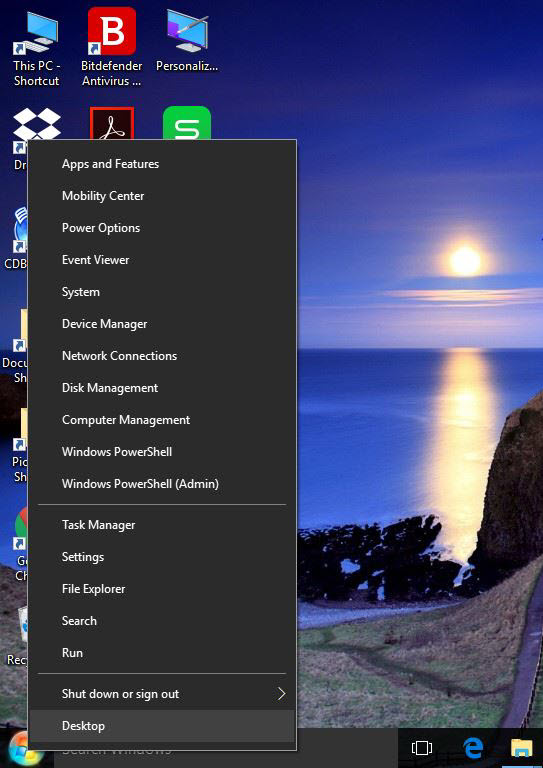
It is the easy way to get to Settings and File Explorer (like an enhanced Windows Explorer) as well as some additional tools.
There is quite a bit of work involved in this process, but for those who really hate the Windows 10 interface, the result can definitely be worth it.
NOTE: If you elect to pursue this customization to make Windows 10 look and act like Windows 7, but don’t need to do a reinstallation of Windows, be sure you have the Windows 10 Anniversary Update installed, and then do Step 1. Once you have your data backed up, begin at Step 5 and complete the process. (You may elect to skip Step 6 if you’re happy with the programs you’ve got, and Step 7 if you want to use Cortana despite the privacy concerns.)
Good luck, and happy customizing!
*Disclaimer: Just a reminder that any advice or recommendations on this website which you elect to follow are suggestions that you try entirely at your own risk. I assume NO responsibility for any negative outcomes or damage to your computer or Windows.


